Setting up a Canon iR-ADV C5550 with Scan to Email with Office 365 for Business.
Microsoft has recently released “High Volume Email for Microsoft 365 (HVE)” which supports sending SMTP email without doing an ‘OAuth dance’, as they phase out simple Login support. At the time of writing, there is no pricing information other than ‘stay under the daily limits’. Also this tool is in ‘preview’ so they might change / remove it at any point.
At the time of writing the limit for HVE during the Preview is 100,000 recipients per day per tenant (and will be expanded at GA). For most office scanners this shouldn’t be a problem (unless you’re also using HVE for some sort of high volume transactional email). Currently you can only have 20 HVE accounts per tenant.
Setup
Note: The majority of this setup can be done using the Web UI, however setting the SMTP port must be done while physically in front of the machine.
Step 1) Create a printer@yourdomain / scanner@yourdomain Hight Volume Email Account (HVE) within the Office 365 Admin / Exchange portal. Go to: https://admin.exchange.microsoft.com/#/mailboxes and then in the left nav:
'Mail Flow' > 'High Volume Email (Preview)'Note: I had issues creating an account when the name was something basic like ‘Printer’, and instead opted to add a second word with a space. So now it’s ‘Printer Scanner’.
Step 2) Login to the Web UI of the Canon Photocopier. Navigate to:
'Settings / Registration' > 'Send' (Under Function Settings) > 'Network Settings - E-Mail/I-Fax Settings'.Step 3) Complete the following info:
Unless specified untick all checkboxes and leave all inputs blank.
SMTP Server: smtp-hve.office365.com
E-Mail Address: [what you created into Step 1]

[x] Allow TLS (SMTP TX)
[x] Use SMTP Authentication (SMTP AUTH)
User Name: [what you created into Step 1]
[x] Change Password
    Password: [your password from step 1]
    Confirm: [your password from step 1]

Allow TLX (SMTP RX): 'Always TLS'

[OK] (top right hand of screen)
*Note about ‘Confirm TLS Certificate for SMTP TX’, ideally you’d want this on, but older machines might not have the required certificate chains.
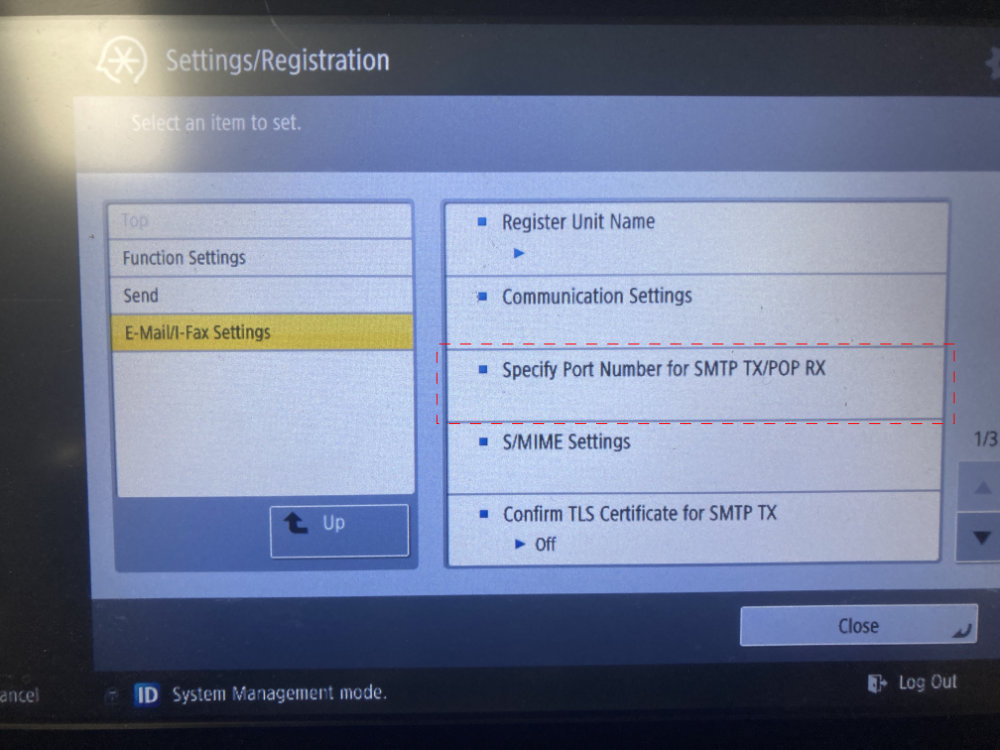
Those paying attention will notice the lack of ability to set a port number on this screen. Sadly they appear to have left it out, but we can set it locally.
Step 4) Set the port to 587. Physically at the machine, bring up the settings / registration menu and login. Navigate to:
'Function Settings' > 'Send' > 'E-Mail/I-Fax Settings'. Tap 'Specify Port Number for SMTP TX/POP RX'
Enter 587 as the SMTP port.
Step 5) Do a sample scan to see if it works.
Sources:
– Configuration Details: https://techcommunity.microsoft.com/blog/exchange/public-preview-high-volume-email-for-microsoft-365/4102271#community-4102271-toc-hId-1926164751
– The magic hidden Port setting: https://community.spiceworks.com/t/canon-scan-to-email-to-microsoft-not-working-gmail-no-problem/829340/9