Category Archives: Tutorials

Canon Scan to Email with Office 365

Setting up a Canon iR-ADV C5550 with Scan to Email with Office 365 for Business.

Microsoft has recently released “High Volume Email for Microsoft 365 (HVE)” which supports sending SMTP email without doing an ‘OAuth dance’, as they phase out simple Login support. At the time of writing, there is no pricing information other than ‘stay under the daily limits’. Also this tool is in ‘preview’ so they might change / remove it at any point.

https://techcommunity.microsoft.com/blog/exchange/public-preview-high-volume-email-for-microsoft-365/4102271

At the time of writing the limit for HVE during the Preview is 100,000 recipients per day per tenant (and will be expanded at GA). For most office scanners this shouldn’t be a problem (unless you’re also using HVE for some sort of high volume transactional email). Currently you can only have 20 HVE accounts per tenant.

Setup

Note: The majority of this setup can be done using the Web UI, however setting the SMTP port must be done while physically in front of the machine.

Step 1) Create a printer@yourdomain / scanner@yourdomain Hight Volume Email Account (HVE) within the Office 365 Admin / Exchange portal. Go to: https://admin.exchange.microsoft.com/#/mailboxes and then in the left nav:

'Mail Flow' > 'High Volume Email (Preview)'

Note: I had issues creating an account when the name was something basic like ‘Printer’, and instead opted to add a second word with a space. So now it’s ‘Printer Scanner’.

Step 2) Login to the Web UI of the Canon Photocopier. Navigate to:

'Settings / Registration' > 'Send' (Under Function Settings) > 'Network Settings - E-Mail/I-Fax Settings'.

Step 3) Complete the following info:
Unless specified untick all checkboxes and leave all inputs blank.

SMTP Server: smtp-hve.office365.com
E-Mail Address: [what you created into Step 1]

[x] Allow TLS (SMTP TX)
[x] Use SMTP Authentication (SMTP AUTH)
User Name: [what you created into Step 1]
[x] Change Password
    Password: [your password from step 1]
    Confirm: [your password from step 1]

Allow TLX (SMTP RX): 'Always TLS'

[OK] (top right hand of screen)

*Note about ‘Confirm TLS Certificate for SMTP TX’, ideally you’d want this on, but older machines might not have the required certificate chains.
Those paying attention will notice the lack of ability to set a port number on this screen. Sadly they appear to have left it out, but we can set it locally.

Step 4) Set the port to 587. Physically at the machine, bring up the settings / registration menu and login. Navigate to:

'Function Settings' > 'Send' > 'E-Mail/I-Fax Settings'. Tap 'Specify Port Number for SMTP TX/POP RX'
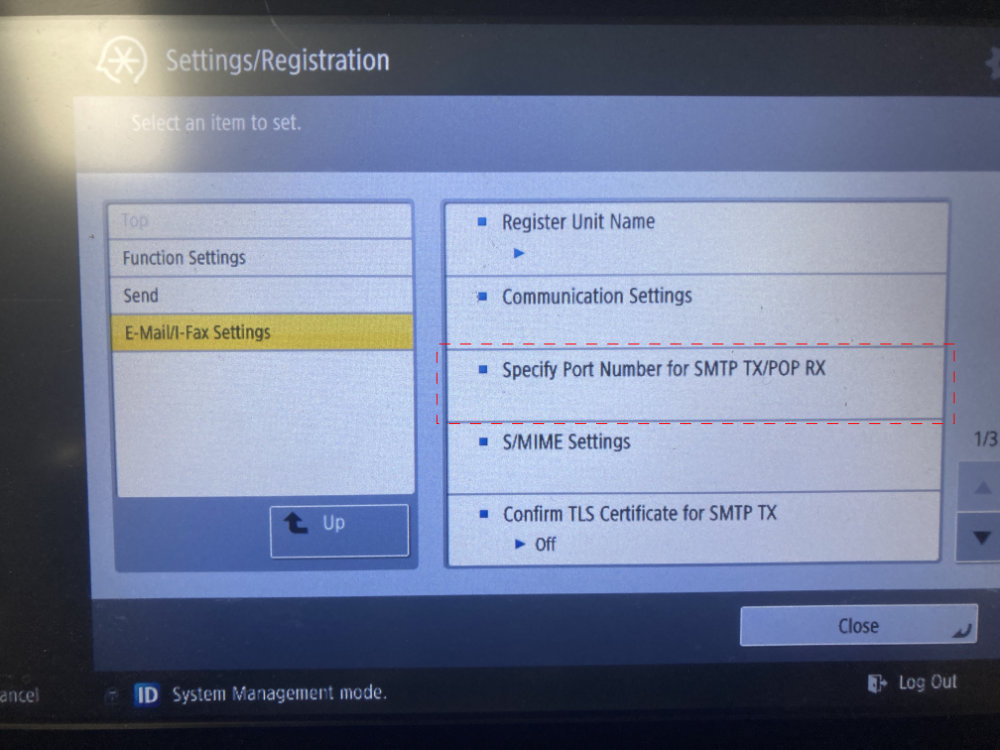
Enter 587 as the SMTP port.

Step 5) Do a sample scan to see if it works.

Sources:
– Configuration Details: https://techcommunity.microsoft.com/blog/exchange/public-preview-high-volume-email-for-microsoft-365/4102271#community-4102271-toc-hId-1926164751
– The magic hidden Port setting: https://community.spiceworks.com/t/canon-scan-to-email-to-microsoft-not-working-gmail-no-problem/829340/9
Installing a Canon Image Runner Advance Printer on a Mac OS

For some reason installing the UFR II/UFRII based printer on Mac OS is strangely complex.

Here’s what to do:
1) Download the correct driver for the Canon Machine / Mac OS from the canon site (I install C2020’s a lot: https://www.canon.com.au/multifunction-devices/imagerunner-advance-c2020/support)
2) Install the Package
3) Within System Preferences > Printers > Add a New Printer.
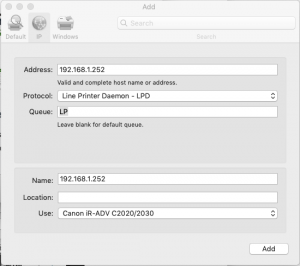
4) Select ‘IP’ from the top tab. Fill the form in as follows:
Address: IP Address of the Printer
Protocol: Change to Line Printer Daemon
Queue: Insert ‘LP’ < this is the part I always forget. Name: A logical name for the user Location: A logical location for the user. Use: Select the Driver from the one that you just installed, in my case I selected 'Canon iR-ADV C2020/2030 Click Add. Canon Printer Mac OS X Settings

It now should now be setup to print.

If you want to setup the default settings on the printer, you need to use the CUPS web interface.
Visit: http://localhost:631/printers/ on the machine.
You’ll probably get a message about CUPS Web interface not being enabled, follow the prompts to open up ‘terminal’ and paste in
cupsctl WebInterface=yes

Then you’ll be able to access the printer UI.
From here you can select the printer, and change the default printer settings.

I always change from 2 sided printing to 1 sided, and from Color to B/W

There you go, installing a Canon Printer or Canon Photocopier on Mac OS X.

Toshiba M400 – Clone / Restore Hard Drive issue STOP: 0x00000007B 0x7B issue

Here is a tough one, cloning or restoring a backup to a new drive for a Toshiba M400 returns a BSOD with Stop 0x7B error.

Here is how to fix it.

  1. Install New Drive into drive bay
  2. Boot M400 and press Esc
  3. When prompted “Check system. Then press [F1] key.” press F1, to enter the BIOS
  4. Use Page Down key to go to the 3rd page and change the Built-in HDD from JBOD to 1RAID-0
  5. When you save you will be prompted for the top secert code, this is: 1 2 3 4 [enter]
  6. Save and exit the BIOS
  7. Complete the system restore/ clone (if cloning from one drive to another, for performance I find it better to take the 2 drives and plug them into 2 SATA ports on another computer and clone there, much faster than an Image or using an external enclosure

A big thanks to the guys here: http://forums.toshiba.com/t5/General-Troubleshooting/M400-Restore-Issue/td-p/25211 for their help and input.

osTicket 1.9.4 –Easy Custom Column in Ticket View

By popular demand, I have update the instructions for the Easy Custom Column for osTicket 1.9.4 for form lists.

What does this allow you to do?
It allows you to show a custom form list in your Agents Ticket Queue. This is rather helpful for when you have a list of items relating to your business and you want to be able to see it.

I have only tested this code with lists.

The full code can be found here:

https://gist.github.com/a-bennett/6febddc9e328151dc99a

For those who are interested in doing it themselves (or maybe have already edited there tickets.inc.php file) you can see the changes between the original file and the updated here:

https://gist.github.com/a-bennett/6febddc9e328151dc99a/revisions

How do I find the form ID?

  1.   By looking at the table _form_field and finding your form object by looking down the list of the labels, then once you have found it taking the ID from that row.
  2. If you know how to inspect an web element, (using web inspector, firebug, etc) then you can try the following:
    In the admin panel go to “Manage” -> “Forms” -> click on your form name.
    Inspect the input field of the name of your item mine came up like this:
    <input type=”text” size=”32″ name=”label-17″ value=”Business”>
    Then take the number after the “label-X” so mine is 17.

For those interested here is a break down:

At the top of the file add the following two lines:
$ab_list[‘field_id’] = “XX”; //ID from from _form_field table
$ab_list[‘heading’] = “XXXXXXX”; //Name displayed to front end users.

~Line 169:
Update the $sortOptions array withe the following:

$sortOptions=array(‘date’=>’effective_date’,’ID’=>’ticket.`number`*1′,
‘pri’=>’pri.priority_urgency’,’name’=>’user.name’,’subj’=>’cdata.subject’,
‘status’=>’status.name’,’assignee’=>’assigned’,’staff’=>’staff’,
‘dept’=>’dept.dept_name’,
‘custom1’=>’Custom1′); //AB Added

~Line 253
Append to the end of the $qselect. variable the following: (remember to move the ;)
.’ ,cdata.’.$CustomList1Name.’ as Custom1′; //AB – Custom 1

~Line 262
Add the following to the $qfrom variable straight after the line:

.’ LEFT JOIN ‘.TABLE_PREFIX.’ticket__cdata cdata ON (cdata.ticket_id = ticket.ticket_id) ‘
.’ LEFT JOIN ‘.TABLE_PREFIX.’form_entry_values fentry_val ON (cdata.field_’.$ab_list[“field_id”].’ = fentry_val.entry_id) AND fentry_val.field_id = ‘.$ab_list[“field_id”] //AB We need to link to the form values as of 1.9.4

~Line 412

Add in the following header row just above the </tr>.

<!– AB – Custom Col 1 –>
<th width=”60″ >
<a <?php echo $custom1_sort; ?> href=”tickets.php?sort=custom1&order=<?php echo $negorder; ?><?php echo $qstr; ?>”
title=”Sort By <?php echo $CustomList1Desc; ?> <?php echo $negorder; ?>”><?php echo $CustomList1Desc; ?></a></th>
<!– AB – Custom Col 1 -–>


~Line 498

Add in the data row just about the </tr>
<!– AB – Custom Col 1 –>
<td nowrap>&nbsp;<?php echo $row[‘Custom1’]; ?>&nbsp;</td>
<!– AB – Custom Col 1 –>

~ Line 511

Finally update the footer colspan to make everything balanced.

<td colspan=”8″>

Creating a ticket via the osTicket API using PHP & Crontab (cron job)

I feel that there is very little documentation and examples around of how to do this, and it bugged me for more than 10 minutes, so I thought I’d share my findings.

The documentation can currently be found here: https://github.com/osTicket/osTicket-1.7/blob/develop/setup/doc/api.md and here: https://github.com/osTicket/osTicket-1.7/blob/develop/setup/doc/api/tickets.md

A sample script can be found here: https://github.com/osTicket/osTicket-1.7/blob/develop/setup/scripts/rcron.php (which is what I based the following example off).

But I like to be somewhat lazy and copy and paste a script, test to see it works and then go about tweaking it.

#!/usr/bin/php -q
 URL to api/tickets.json e.g http://yourdomain.com/support/api/tickets.json
# key => API's Key (see admin panel on how to generate a key)
#

$config = array(
'url'=>'http://yourdomain.com/support/api/tickets.json',
'key'=>'[long api key goes here]'
);

#pre-checks
function_exists('curl_version') or die('CURL support required');

#set timeout
set_time_limit(30);

#Sample data for the ticket
# See https://github.com/osTicket/osTicket-1.7/blob/develop/setup/doc/api/tickets.md for full list of variables and options that you can pass.
$data = array("alert" => "true",
       "autorespond" => "true",
       "source" => "API",
       "name" => "Angry User",
       "email" => "[email protected]",
       "subject" => "Testing API 3",
       "message" => "MESSAGE HERE"
);
#Convert the above array into json to POST to the API with curl below.
$data_string = json_encode($data);

#curl post
$ch = curl_init();
curl_setopt($ch, CURLOPT_URL, $config['url']);
curl_setopt($ch, CURLOPT_POST, 1);
curl_setopt($ch, CURLOPT_POSTFIELDS, $data_string);
curl_setopt($ch, CURLOPT_USERAGENT, 'osTicket API Client v1.7');
curl_setopt($ch, CURLOPT_HEADER, TRUE);
curl_setopt($ch, CURLOPT_HTTPHEADER, array( 'Expect:', 'X-API-Key: '.$config['key']));
curl_setopt($ch, CURLOPT_FOLLOWLOCATION, FALSE);
curl_setopt($ch, CURLOPT_RETURNTRANSFER, TRUE);
$result=curl_exec($ch);
curl_close($ch);

if(preg_match('/HTTP\/.* ([0-9]+) .*/', $result, $status) && $status[1] == 200)
exit(0);

echo $result;
exit(1);
?>


Then follow your hosts instructions for adding a Cron Job.
Mine looks something like this:

php /home/abennett/public_html/sample-api.php

IIS Admin Error Failure to Start

Today I received the following error after bringing a XenDesktop Virtual Desktop Delivery Controller back up after a power outage: The IIS Admin Service service terminated with service-specific error 2149648394 (0x8021080A).

A quick search on the internet and I found this resource:

http://geekswithblogs.net/mhamilton/archive/2006/12/13/101055.aspx

Here are the steps outlined (and what I used to fix it):

Check in C:\Windows\System32\Inetsrv and you’ll find a ‘History’ folder. Within here – hopefully – you’ll find fairly recent backups of the Metabase.XML and MBSchema.XML objects. Before doing the following – be sure to backup the existing Metabase.xml and MBSchema.xml from C:\Windows\System32\Inetsrv first.

Now, rename a recent backup from the ‘History’ folder – renaming a recently Metabase.XML object, and then a recent MBSchema.XML object. Copy / Paste each of these to the C:\Windows\System32\Inetsrv.

Ahh, not quite done.

Now do a IISRESET from a command prompt.

IIS started and staff were able to get back to work.

[How to] Bulk import/rip multiple CDs easily in Windows. (Windows 7 and Windows Media Player)

Recently I had the task of importing a large number of CDs. Being one that doesn’t boring and tedious task like this I set out to make it as easy as possible. It seems that Windows Media Player is rather good at this (or at least version 12 is, the one with Windows 7).

I was able to get it to a point where I had 2 piles of CDs. One to rip and one that had been ripped and all I had to do was take 1 from the to Rip pile, insert it into the CD tray and then after the tray ejected (automatically) I placed it in the ripped tray and then proceeded with the next CD, so on for the next 30 or so CDs. All with no software interaction.

Here is how I did it.

1) I inserted the first CD and opened up Windows Media Player.

2) In the library video click on “Organize”  -> “Options” -> “Rip Music” Tab.

3) I set all the information required:

  • Location of files
  • Format (I used MP3 at Best Quality or 320 kbps – Hard drive space is cheap these days).
  • I also ticked “Rip CD automatically” and “Eject CD after Ripping.

4) Finished up with Clicking Ok and then Rip. Then I carried on some other tasks on the computer. When the CD finishes it opens the tray, I had to change it, insert the next and away it went – automatically.

Side note – I also had iTunes opening each time that I inserted a disc. To fix this I did the following.

  • Click on Start (or what should be start, the round ball in the bottom left corner).
  • Searched for “AutoPlay” (Can be found the long way under Control Panel -> All items).
  • Under “Audio CD” I changed the setting from “Play audio CD in iTunes” to ” Play audio CD using Windows Media Player” – Easy fix.


Overkill Router for any small business (or advanced home user)

Small businesses generally have an IT budget of 0, but need the best performance that money can buy.

Most small businesses rely on their little modem/router/wireless access point combination plastic box to perform all the needed tools and utilities to get the internet around their network to all their uses. But sometimes there comes a day where the little router just doesn’t have the functions required for the expanding network. (Such as complex block lists, cache, VPN functions etc). But at the same time, any left over IT budget goes into upgrading staff machines, rather than the network infrastructure.

But you don’t have to pay a lot for these extra features. If you have an old machine lying around the office, the only major upgrade that you might have to do is spend $15 on a new PCI network card and 10 cents on a CD to turn that machine into a fully fledged Firewall/Router/Proxy Server/etc.

What we are doing is turning that old Windows 98 machine into a dedicated (i.e you can’t use it for anything else) firewall and router for your small business network.

Basically all you need is a copy of either of the following operating systems:

And a machine with 2 network cards.

*Endian calls itself a Unified Threat Management & Requires better hardware than the others listed. It can perform virus and spam scans on the data in real time as it passes though the firewall. Pretty cool ey.

Check out Episode 718 of Hak5 to see how they turned a few parts they had lying around (Motherboard with a Intel Atom processor, 2GB of ram, 250GB IDE harddrive, please note they do stress that what they are using is an overkill but the process is still the same. Ed Note: The current Firewall at the office here is a simple 133Mhz processor, with 32 mb of ram & a 3 GB hard drive, it runs 24/7 and serves upto 8 users, IPCop or Smoothwall can run on almost anything) into a dedicated router and firewall.

Once you have it setup, just plug it into your network between the modem and your switch and let it go.

Command Line Mounting and Unmounting drives/volumes – Windows

Today we came across an issue while working on a virtual server. We had created a virtual hard drive, attached it to the virtual Windows 2008 Server machine, added some files to it and wanted to unmount the virtual drive and then attach it to another virtual machine.

The virtual machine manager (XenCenter in this case) wouldn’t allow us to disconnect the drive, while the virtual guest OS was still using it.

A quick Google and we finally found this command:

mountvol

Creates, deletes, or lists a volume mount point.

That’s exactly what we needed. Heres how to use it:

Creates, deletes, or lists a volume mount point.

MOUNTVOL [drive:]path VolumeName
MOUNTVOL [drive:]path /D
MOUNTVOL [drive:]path /L
MOUNTVOL [drive:]path /P
MOUNTVOL /R
MOUNTVOL /N
MOUNTVOL /E

path        Specifies the existing NTFS directory where the mount
point will reside.
VolumeName  Specifies the volume name that is the target of the mount
point.
/D          Removes the volume mount point from the specified directory.
/L          Lists the mounted volume name for the specified directory.
/P          Removes the volume mount point from the specified directory,
dismounts the volume, and makes the volume not mountable.
You can make the volume mountable again by creating a volume
mount point.
/R          Removes volume mount point directories and registry settings
for volumes that are no longer in the system.
/N          Disables automatic mounting of new volumes.
/E          Re-enables automatic mounting of new volumes.

To unmount the drive that was in use we just used:

mountvol E:\ /D

The E:\ drive was then released from Windows and this allowed us to use and mount the disk else where.