Tag Archives: IT Support

Canon Scan to Email with Office 365

Setting up a Canon iR-ADV C5550 with Scan to Email with Office 365 for Business.

Microsoft has recently released “High Volume Email for Microsoft 365 (HVE)” which supports sending SMTP email without doing an ‘OAuth dance’, as they phase out simple Login support. At the time of writing, there is no pricing information other than ‘stay under the daily limits’. Also this tool is in ‘preview’ so they might change / remove it at any point.

https://techcommunity.microsoft.com/blog/exchange/public-preview-high-volume-email-for-microsoft-365/4102271

At the time of writing the limit for HVE during the Preview is 100,000 recipients per day per tenant (and will be expanded at GA). For most office scanners this shouldn’t be a problem (unless you’re also using HVE for some sort of high volume transactional email). Currently you can only have 20 HVE accounts per tenant.

Setup

Note: The majority of this setup can be done using the Web UI, however setting the SMTP port must be done while physically in front of the machine.

Step 1) Create a printer@yourdomain / scanner@yourdomain Hight Volume Email Account (HVE) within the Office 365 Admin / Exchange portal. Go to: https://admin.exchange.microsoft.com/#/mailboxes and then in the left nav:

'Mail Flow' > 'High Volume Email (Preview)'

Note: I had issues creating an account when the name was something basic like ‘Printer’, and instead opted to add a second word with a space. So now it’s ‘Printer Scanner’.

Step 2) Login to the Web UI of the Canon Photocopier. Navigate to:

'Settings / Registration' > 'Send' (Under Function Settings) > 'Network Settings - E-Mail/I-Fax Settings'.

Step 3) Complete the following info:
Unless specified untick all checkboxes and leave all inputs blank.

SMTP Server: smtp-hve.office365.com
E-Mail Address: [what you created into Step 1]

[x] Allow TLS (SMTP TX)
[x] Use SMTP Authentication (SMTP AUTH)
User Name: [what you created into Step 1]
[x] Change Password
    Password: [your password from step 1]
    Confirm: [your password from step 1]

Allow TLX (SMTP RX): 'Always TLS'

[OK] (top right hand of screen)

*Note about ‘Confirm TLS Certificate for SMTP TX’, ideally you’d want this on, but older machines might not have the required certificate chains.
Those paying attention will notice the lack of ability to set a port number on this screen. Sadly they appear to have left it out, but we can set it locally.

Step 4) Set the port to 587. Physically at the machine, bring up the settings / registration menu and login. Navigate to:

'Function Settings' > 'Send' > 'E-Mail/I-Fax Settings'. Tap 'Specify Port Number for SMTP TX/POP RX'
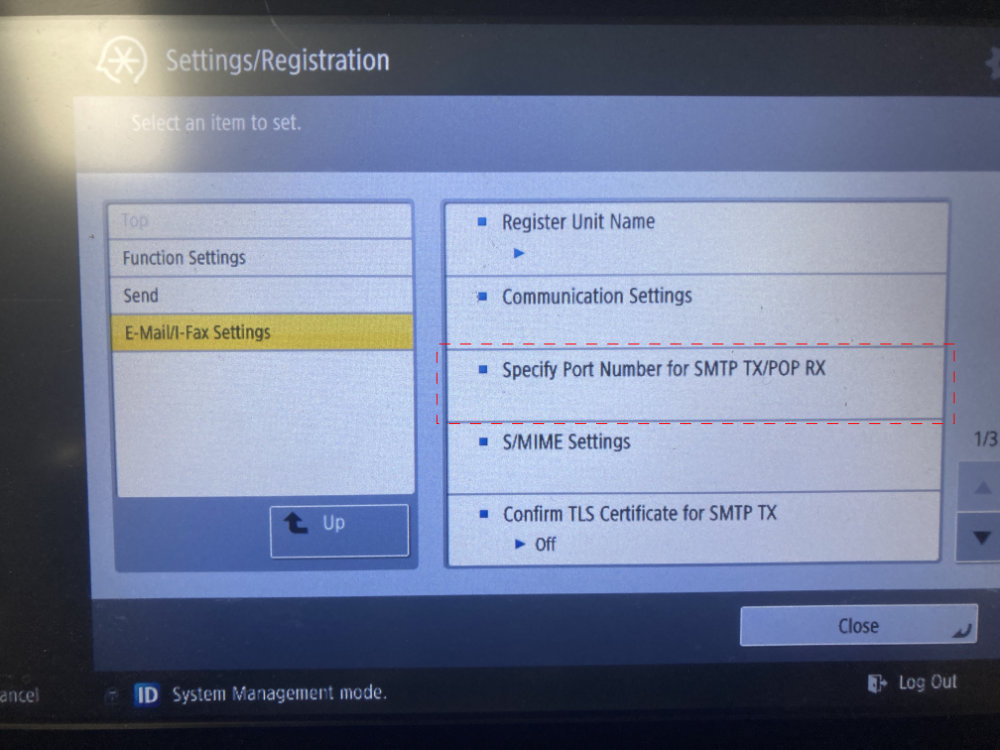
Enter 587 as the SMTP port.

Step 5) Do a sample scan to see if it works.

Sources:
– Configuration Details: https://techcommunity.microsoft.com/blog/exchange/public-preview-high-volume-email-for-microsoft-365/4102271#community-4102271-toc-hId-1926164751
– The magic hidden Port setting: https://community.spiceworks.com/t/canon-scan-to-email-to-microsoft-not-working-gmail-no-problem/829340/9

Spago BI Installation

TL;DR

Installing Spago BI.

  1. First install JDK and set 3 system paths:
    • JAVA_HOME: C:\Program Files\Java\jdk<version>
    • JRE_HOME: C:\Program Files\Java\jre<version>
    • Add to PATH: ;C:\Program Files (x86)\Java\jdk<version>\bin
  2. Now run the SpagoBI installer.
  3. Run SpagoBI from Start Menu
  4. Open up a browser and enjoy.

Here are some rough notes from installing Spago BI in a somewhat blind way. (I should have probably read the docs first.)

Installation Platform:

  • Windows Server 2003 R2 x64
  • 2gb ram
  • 2 vcpus
  • XenServer 6 as host.
  1. Download the SpagoBI 4.2 installer and unzip and run.
  2. Run installer, I ticked all the options (not sure that this was the best idea).
  3. Each package selected in Step 2 has to be individually downloaded, so it takes a while.
  4. Java needs to be installed. I grabbed the JDK from Ninite.
    But the System Path Variables also need to be put in place before Spago will run. (I used the Program Files (x86) folder in the paths below).

    • JAVA_HOME: C:\Program Files\Java\jdk<version>
    • JRE_HOME: C:\Program Files\Java\jre<version>
  5. After startup, open your browser at:
    http://localhost:8080/SpagoBISpagoBI login page will appair. Log yourself as:
    – biadmin/biadmin (technical user)
    – biuser/biuser (business or functional user)
    – bidemo/bidemo (showcase user)
  6. Nothing loaded for me. Trying a reboot.
  7. Reading the console output, I possibly shouldn’t have left everything ticked in step 2, now that it has to try and load them all.
    Finally it loaded and reported the following in the console:
    INFO: Server startup in 630557 ms (that’s 10.5 minutes!)
  8. Can’t connect to sample database, I found a “start.bat” file which complained about not having access to “JAVA”. Looks like I need to add JAVA bin folder to the System Path. Restarting Spago / Tomcat
  9. This time round, a second command prompt window has also opened loading the foodmart database.
  10. Demo now appears to be working.

What’s that connector?

Computer hardware posterIf your someone that only opens up a computer every other month, or your upgrading something from a few years ago it can be hard to work out what that connector is that your trying to interface into. Well luckily Sonic840 has put together a poster to help in such situations. Check out the full sized version over at Deviantart

Components Covered Include

Ram (Both Notebook and Desktop)
Hard Drive Connectors
CPU Sockets
Processor Card Slots
Processor Card Sockets
Power Connectors
Peripheral Cards
Motherboard Back panel ports (Audio/Video/Data)
Desktop Card Slots

Call us slow…but Hyper V Server is free…

Today we were researching VDIs in the office for a client and came across Hyper V server from Microsoft, after looking around it appears that it’s free. We are currently downloading it and will be testing it out over the course of the next week, along with CitrixXen Server and XenDesktop.

Do you have a favourite VDI or virtualization platform? Then be sure to let us know in the comments.

Microsoft Hyper V

Buy Cables in Bulk to save money [Tips]

Buy in bulk to save on computer cables.When working with computers you can almost never have enough cables. The main cables in use are

  • IEC Power cords (also known as Kettle Cords)
  • Power Boards
  • SATA drive cables
  • Molex to SATA power adaptors
  • VGA, DVI, HDMI video leads
  • USB cables

It’s rather annoying when starting on a project and you get held up because you don’t have the correct cable for the job. (You new mother board came with 2 SATA, and your trying to install 3 SATA devices). So by investing in a little bit of cash now you can save yourself time, effort and energy down the track.

I recently needed a couple of extra SATA cables for a job and some other upgrades. Instead of going to shop and buying them for $5 each I was able to pick up a bulk pack of 10 for under $7 online, with free shipping. That’s a saving of over $43, plus 1 hour of my time (remember time is worth more than gold these days) because I didn’t have to waste that 1 going to the shop.

Overkill Router for any small business (or advanced home user)

Small businesses generally have an IT budget of 0, but need the best performance that money can buy.

Most small businesses rely on their little modem/router/wireless access point combination plastic box to perform all the needed tools and utilities to get the internet around their network to all their uses. But sometimes there comes a day where the little router just doesn’t have the functions required for the expanding network. (Such as complex block lists, cache, VPN functions etc). But at the same time, any left over IT budget goes into upgrading staff machines, rather than the network infrastructure.

But you don’t have to pay a lot for these extra features. If you have an old machine lying around the office, the only major upgrade that you might have to do is spend $15 on a new PCI network card and 10 cents on a CD to turn that machine into a fully fledged Firewall/Router/Proxy Server/etc.

What we are doing is turning that old Windows 98 machine into a dedicated (i.e you can’t use it for anything else) firewall and router for your small business network.

Basically all you need is a copy of either of the following operating systems:

And a machine with 2 network cards.

*Endian calls itself a Unified Threat Management & Requires better hardware than the others listed. It can perform virus and spam scans on the data in real time as it passes though the firewall. Pretty cool ey.

Check out Episode 718 of Hak5 to see how they turned a few parts they had lying around (Motherboard with a Intel Atom processor, 2GB of ram, 250GB IDE harddrive, please note they do stress that what they are using is an overkill but the process is still the same. Ed Note: The current Firewall at the office here is a simple 133Mhz processor, with 32 mb of ram & a 3 GB hard drive, it runs 24/7 and serves upto 8 users, IPCop or Smoothwall can run on almost anything) into a dedicated router and firewall.

Once you have it setup, just plug it into your network between the modem and your switch and let it go.

Taking the Plunge – WordPress 3.0 Upgrade with Cpanel Backup.

There is always a risk involved in any upgrades, any of the following possibilities could happen:

1)      WordPress doesn’t successfully complete the upgrade of the new files (maybe because of file permission issues) and corrupts your current Word Press install.

2)      WordPress doesn’t successfully complete the upgrade any database changes and corrupts your Word Press install.

3)      Upgrade to the new version of WordPress was successful, but due to plug-in conflicts your WordPress install is broken.

But there is also a risk involved when you walk outside of your house. So how do we manage the risk? The answer is simple, do a backup.

Before installing any update, WordPress recommends that you go read and apply tips from the Article “WordPress Backups”[http://codex.wordpress.org/WordPress_Backups] from the Codex, which gives a great list of resources of how to backup using multiple tools. But one of the methods that they left out was using the Cpanel backup that is built into most shared hosting services these days. This tutorial is going to cover how to do it.

The main reason for using the Cpanel Backup wizard is that it quickly allows you to restore the backup without needing to know anything technical. Just a simple follow the steps in the Backup Restore wizard.

Backing up your WordPress install with Cpanel:

Time to complete: About 20 minutes (depending on how quick your internet connection is/size of your blog).

Skill Level: Easy.

1). Login to your webhosts Cpanel and find the “Backup Wizard” Icon.

Step 1 - Cpanel Backup

2). Select Backup under Backup and Restore.

Step 2 - Cpanel Backup Wizard

3). As tempting as it may be to click on full backup for our purposes today we need to click on “Home Directory” under the Partial Backup (this allows the backup to be restored under Cpanel if required).

Step 3 - Cpanel Partial Backup - Not a full backup!

4) Click on the Home Directory button to download the backup. – The size of this will depend on how big your blog is/how much storage that you are using with your hosting account.

Step 4 - Cpanel Home Directory Backup

5) Once the download is complete, click on Go Back, so you are presented with the screen from step 3, then click on MySQL Databases.

6) Download the Database that corresponds to your WordPress install. This screen shot shows that I have 2 databases. One is for a Joomla install and one is for WordPress, since they were automatically installed in the Cpanel they have generic names such as “sample_wrdp1” which makes it easy to do this.

Step 5 - Cpanel Database

7) Once you have everything downloaded, log into your WordPress Admin. Along the top there should be an alert that WordPress 3.x.x is available! Please update now. Click to update.

Step 7 - WordPress Admin with an Update Alert

8) WordPress then asks if you want to update automatically (easy option) or download the update to upload later (harder, but works on more hosts). I chose to update automatically.

9) WordPress will then perform the update and let you know when it’s finished.

Step 9 - The Upgrade Process

10) The first thing I noticed after the update was a new fresh Admin Theme.

Step 10 WPAdmin Fresh Upgrade Screen with new Admin Theme

11) Now check out your blog to make sure things are still working, also check to see if your plugins are working or if any need updates.

Photo: Thanks to zephyrance via Flickr